- Products
- Solutions
- Services
- Resources
- Customer Success
- Company
- Sign In
- Contact Us

So are you planning to create your own iOS app? Well, that is a great idea. In fact, developing an app is a rewarding and fun experience. However, if don’t have any idea on how to get started you don’t have to worry about it because we are here to help you.
On the other hand, you can also hire iOS developers if you want. In fact, there are lots of iOS application development companies that are willing to help you in making your dream app possible.
Nevertheless, in this article, we will show you the step by step process on how to create a simple and real-world iOS app. Rest assured that at the end of this article you will be able to know more about iOS app development.
But before anything else, let us go over the different tools that you will be needing to build an iOS app and prepare your mind for learning an iPhone app development.
*Get a Mac. The basic tool for iPhone application development is having a mac. For you to create an iOS app, you need to get a Mac that has an Intel-based processor that is running on Mac operating system version 10.12 or lower.
*Register your Apple ID. In order to download the Xcode as well as to access other important resources, you need to register your Apple ID. And most importantly you will be able to test your app in any real iOS devices.
*Install Xcode. In order to start building an iPhone app you to download Xcode which is an IDE or Integrated Development Environment given by Apple. In fact, this tool will give you everything you need for iOS mobile app development. In installing the Xcode you have two options. You can download it from Apple’s developer site or download it from the Mac App Store.
*Step 1. Go to App Store App
*Step 2. In the right (top) corner of your screen, there is a search bar, type Xcode and then press the “Return” key.
*Step 3. Once you have located the Xcode app in the search result, click “Get” and then click “Install App” afterward.
*Step 4. Then enter your Apple password and ID when prompted.
*Step 5. The Xcode will be downloaded into /Applications directory.
Now that you already know the tools needed and how to download the Xcode, let us now move on to the iOS app development as well as iPhone application development process.
So get ready, because we are about to start.

In this section, we will show you how to make a simple UI and how to view it the stimulator.
Actually, Xcode comes with quite a lot of built-in templates that you can use to develop different iOS apps like apps and games. Also, some of these templates have source code files and preconfigured interface. But, in this content, we will be using the most simple and basic template.

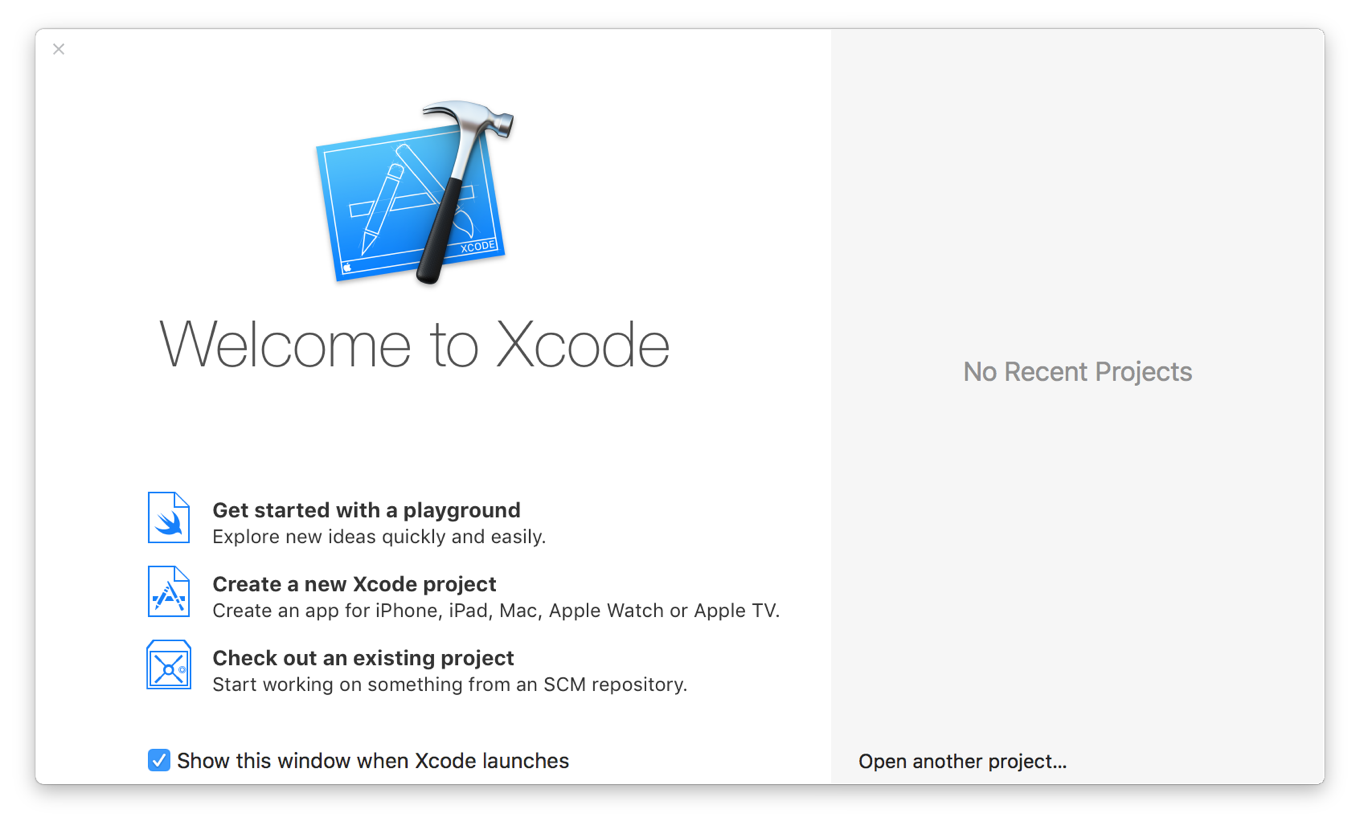
*Open your Xcode that is located in /Applications Directory.
*Click “Create a new Xcode Project” in the welcome window if it is your first time to launch the Xcode, but if not you can click “Choose File” followed by “New” then click “Project”.
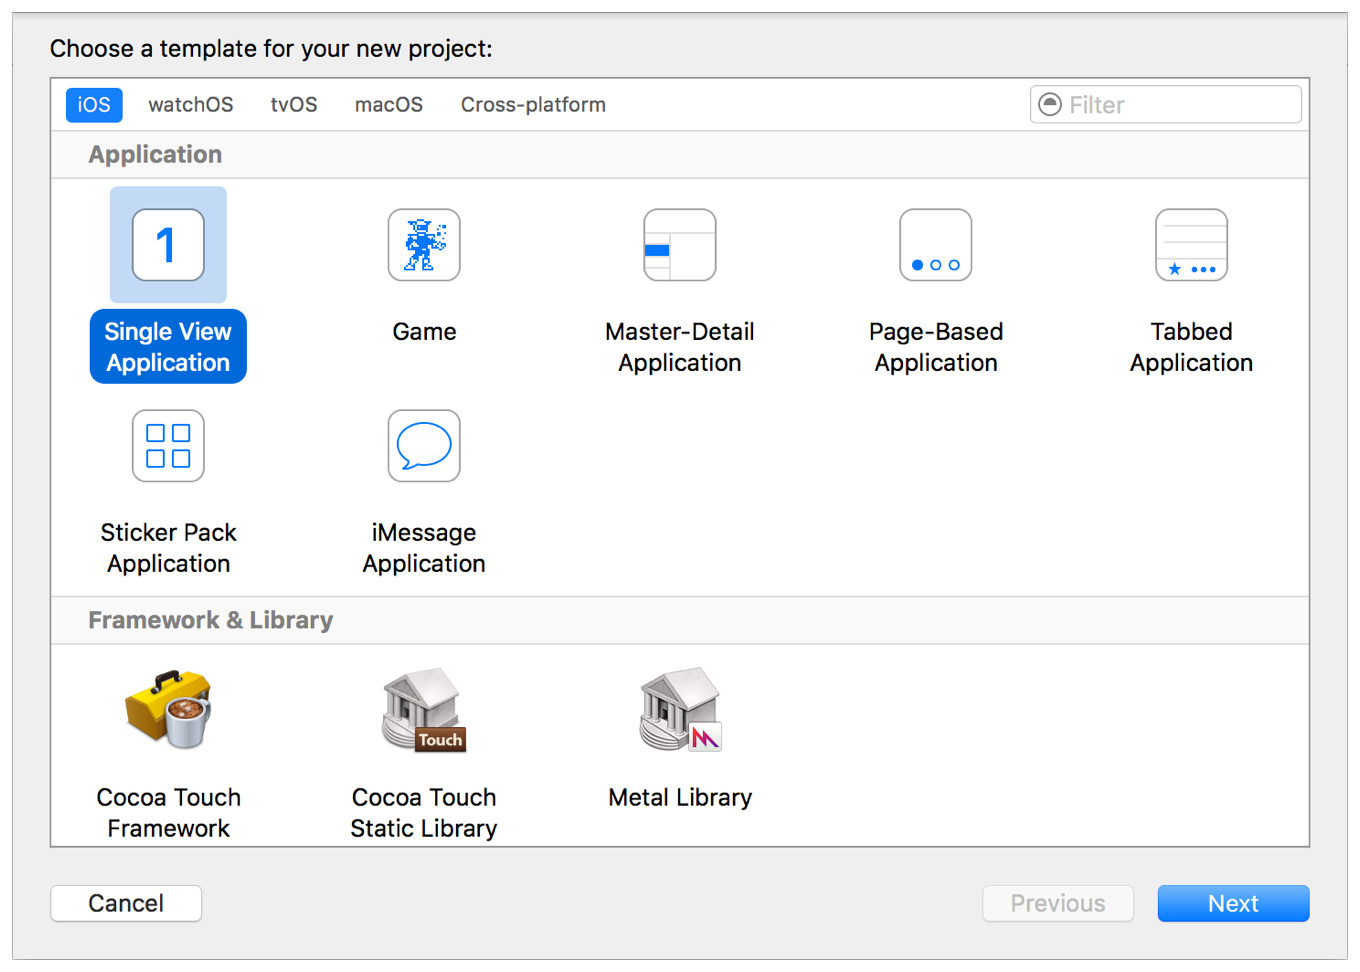
*After you have created a new project a dialog box will pop up then you need to click “iOS”.
*Under the “Application” section, choose “Single View Application” afterward click “Next”.
*After clicking the “Next” button another dialog box will pop up from your screen and you need to fill up some fields such as
*Team. Set the field Team to “None”
*Organization Identifier. You can make use of “.com.example”.
*Organization Name. You can use your own or organization name.
*Language. Swift
*Bundle Identifier. It is an auto-generated value and it will depend on your organization name and product name.
*Devices. Universal
*Include UI Test. Unselected
*Include Unit Tests. Selected
*Use Core Data. Unselected
*After entering all the needed information click “Next”
*However, in the dialog box that will appear, you need to choose a location where you want to save your project, then click the “Create” button.
There you have it the steps on how to create a new project in Xcode.
Since you are using an Xcode template, the application environment is already set up. Meaning to say, you can run the template “Single View Application” without performing any configuration. However, in order to run your iPhone app, you need to use the “iOS Simulator” application that is included in Xcode. This app, on the other hand, will show you the look of your app as well as how it functions while running on an iOS device.
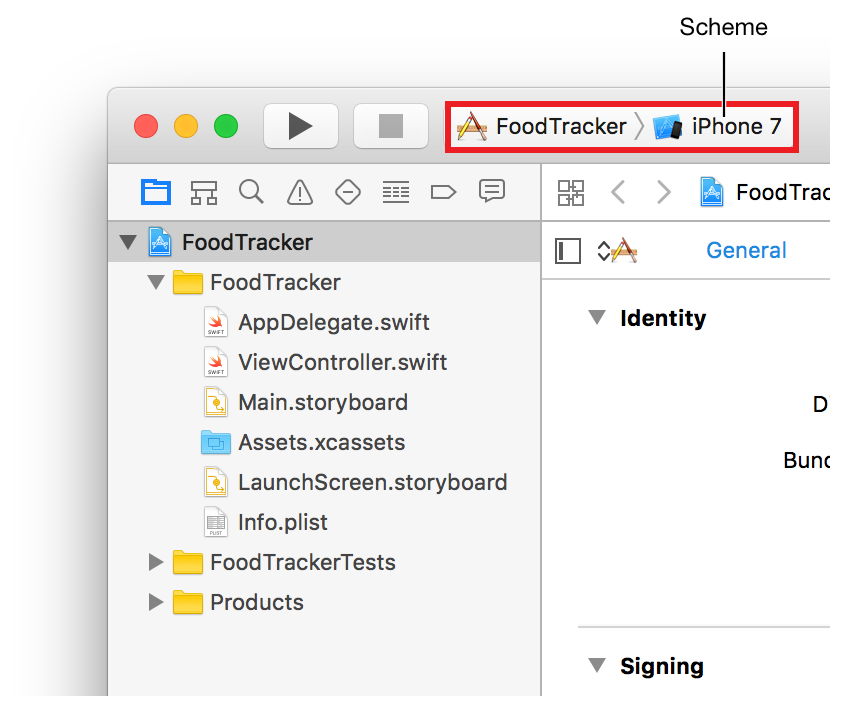
*In your Xcode’s toolbar, look for the Scheme pop-up menu and select iPhone 7
*After which, click the button with a triangle shape to run your app, this button is located at the left (top) corner of the Xcode toolbar. Otherwise, select “Product” and then click “Run”.
*Then the process will begin. However, if the process is completed Xcode will display a message. But if it’s your first time, it may take a few minutes start.
*The iOS simulator opens your app on the iPhone mode depending on the version you have specified.

Every element in your storyboard a file that consists of visual representations if your app’s user interface is linked to a source code. In a certain storyboard, a scene denotes one view controller and screen content. A view controller coordinates how the information flows between your app’s data model.
On the other hand, Xcode already created a class known as the ViewController.swift. In fact, this class is already connected to the project you are currently working on. However, you can also use other connections aside from Viewcontroller.swfit.
Also, if you want to define your app’s interaction, you need to ensure that the source code of your view controller can connect with the views in the storyboard. However, you can define it by means of adding new connections known as actions and outlets.
How to Make Outlets for User Interface Elements
An outlet offers a way to place interface objects or the object you will be adding to your storyboard from source code file. For you to create an outlet, perform a control and drag action from a certain object in your storyboard in order to display the view controller file. This action makes a property for the object into the view controller file that allows you to manipulate and access that object during runtime.
Nevertheless, you need to make outlets that are intended for text fields as well as label in your UI so that you will be able to reference them.
How to link the text fields in the ViewController.swift source code
*Open the Main.storyboard
*Open the “Assistant Editor” by clicking the “Assistant” button.
*Then change it from Preview to Automatic (ViewController.siwft), in the editor selector tab
*In the ViewController.siwft, look for the class line that looks like this class ViewController: UIViewController {
*Below it, add this comment //MARK: Properties which is a kind of comment that is used to managed and organized your source codes
*In your storyboard, choose the text field and control-drag the text field below the comment you added in ViewController.swift.
*After which, in the dialog box that appears, enter nameTextfield on the Name field.
*Then click the “Connect” button.
On the other hand, in connecting the label to the ViewController.swift, you can connect it by simply following the same procedure in connecting the text field.
How to Define an Action to Implement
An action is a section of code that is connected to an event that can take place in your application. However, you can define a particular action method to achieve anything from updating the UI to manipulating data. In fact, you can make actions by doing the same approach in making outlets. You can start making an action that sets the label to “Default Text”.
How to make setDefaultLabelText actions in ViewController.swift code.
*In the ViewController.swift add this comment //MARK: Actions just above the closing curly brace
*After which, in your storyboard, choose the button labeled with “Set Default Label Text”
*Control-drag the button to the editor and place it below the comment that you have added a while ago.
*After which, in the dialog box that appears, select Action for Connection for the name, enter setDefaultLabelText. and for type, choose UIButton.
*Then click “Connect”
How to work with a View Controller?
In this section, we are still discussing UI or user interface. But we will be focusing on how to use an image picker and add image views to the scene.
How to add a photo to your scene?
*Open the Main.storyboard
*In the “Utility Area” go to “Object Library” then type “image view” in the search bar in order to find it quickly
*From the Object library, drag the object Image View to your scene
*To resize and position your image go to “Size Inspector” which is found in the “Utility Area”
*In the field intended for Intrinsic Size, select “Placeholder”
*Enter 320 in both height and width fields then press “Return”
*On the right (bottom) part of your canvas, open the menu labeled with “Pin”
*Check the checkbox that is next to the “Aspect Ratio”.
*Then go to “Pin” menu and click the button with Add 1 Constraints.
How to add a photo to your project?
*Select the Assets.xcassets, in the “Project Navigator” to see the asset catalog.
*Click the + button found on the left (bottom) corner and from the menu that will pop up choose “New Image Set”.
*Double-click it and change its name to defaultPhoto
*On your desktop, choose the photo you want to include
*After choosing, drag the photo and drop it into 2x space in the image set.
How to show a default image in the image view
*Open the storyboard and choose the image view
*With the image view selected, in the Utility Area go to Attributes inspector and look for the field labeled with Image then select defaultPhoto.
HOW TO IMPLEMENT CUSTOM CONTROLS?
How to Create a Custom View?
In order to rate a particular thing, users need to use controls, for example, by means of stars. Actually, there are many ways to implement this, but in this content, we will be focusing on a direct approach by means of building custom controls by joining existing controls and views. You will make a subclass of stack view that copes a set of buttons signifying the stars.
However, to start designing the UI, behavior, and interaction of this control, start by making a stack view subclass.
How to make a Subclass of UIStackView
*Press Command-N or Choose File, New, then File
*A dialog box will pop up, select iOS
*After selecting, choose the “Cocoa Touch Class” then click Next
*Type Rating Control in the Class field and select UIStackview in the field labeled with “Subclass of”
*Nevertheless, make sure that the selected language is Swift
*Click Next and then click Create as well
*If needed, drag the RatingControl.swift file and drop it into the Drop navigator.
How to Display the Custom View?
In order to display the custom control, in your storyboard you need to include a stack view and set a connection.
*Open your storyboard
*Find the “Horizontal Stack View Object” in your storyboard using the “Object Library”.
*Open the identity inspector but make sure that the horizontal stack view is selected.
*Look for the field labeled with Class then select RatingControl in the Identity inspector.
How to Create a Data Model?
In this lesson, we will be discussing how to create a data model where you can store information of the things that you will display in your app.
Steps in Creating a Data Model
*Go to Choose File, click New and then choose File.
*Select iOS on the dialog box that will appear
*Select the Swift File then click Next
*Name your data model, by typing something in the “Save As” field, for example, Meal.
*Then click Create. Your file will be saved in the Project Directory by default.
How to Define A Data Model?
*Click the Standard button, if the Assistant Editor is already open
*Open the Meal.swift if you can remember we named the data model with Meal
*Then change the import Foundation to import UIKit
*Under the important statement, include this line of codes
class Meal{
//MARK: Properties
var name: String
var rating: Int
var photo: UIImage?
}
*Under the properties, add this line if code
//MARK: Initialization
init?(photo UIImage?, name: String, rating:Int) {
}
*Set the properties equal to the value of parameters
//Initialized properties
self.rating = rating
self.photo = photo
self.name = name
*Add these following codes on top of the line of codes that initializes the properties
if name.isEmpty ||rating <0 {
return nil
}
Nevertheless, the code will look like this:
init?(photo UIImage?, name: String, rating:Int) {
if name.isEmpty ||rating <0 {
return nil
}
//Initialized properties
self.rating = rating
self.photo = photo
self.name = name
}
Nevertheless, this comprehensive guide to iOS application development is written using Swift 3, Xcode version 8.1, and iOS SDK 1. However, if you are using a different version, you need to make some changes to your code, in order to compile it successfully.
However, perhaps you are now ready to start your app, but before you begin, take a look at the following pointers so that you will be able to come up with a successful app.
*Register as an iOS app developer
*Learn how to design a simple yet good-looking app interfaces
*Test and Debug your App
*Study the Swift programming language
*Submit your app to the Apple Store
*Learn how to build great iPhone apps
*Learn more about iOS technologies
Final Thoughts:
iPhone app development is not an easy task, especially if you don’t have knowledge about programming. Fortunately, there are lots of iOS app development companies all over the world. But make sure to seek help from a reputable iOS application development company. Nevertheless, if you think you can then this guide will surely help you a lot. Though you can still look for an iPhone app developer for hire.